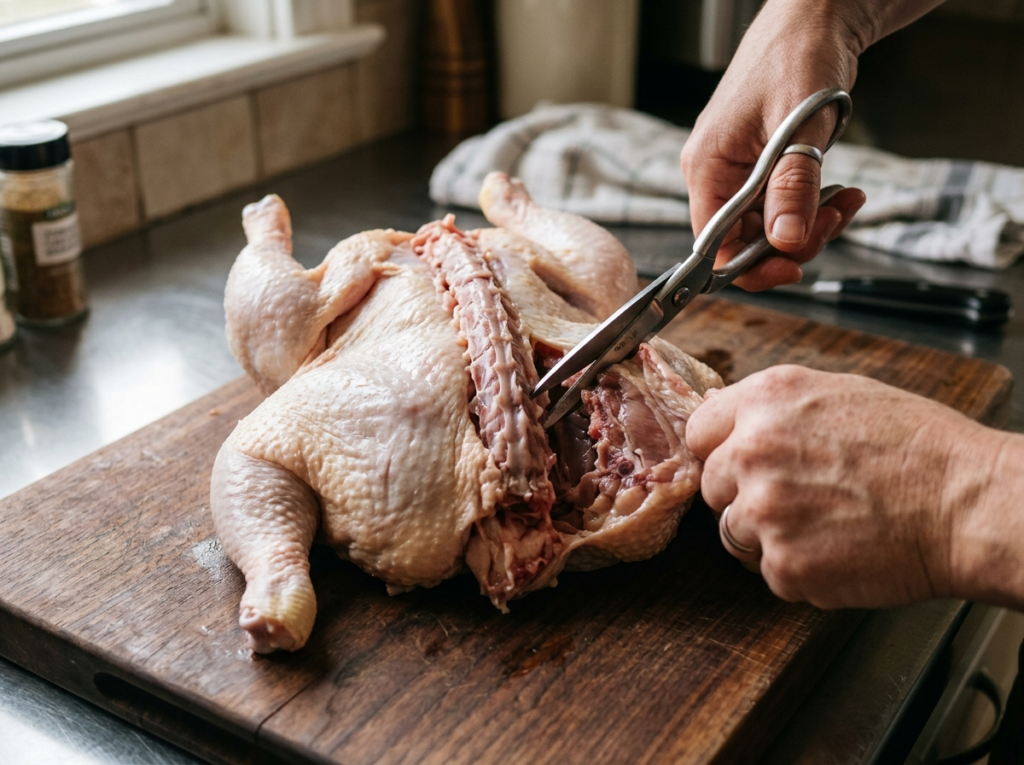
A whole roasted chicken takes roughly 90 minutes in the oven. A spatchcocked chicken? About 40 to 45 minutes. Same bird, same oven, dramatically different timing — and honestly, dramatically better results. If you’ve ever struggled with a roast chicken that has dry breast meat and flabby skin on the thighs, spatchcocking fixes that problem almost entirely. It’s one of those techniques that sounds intimidating (the name doesn’t help) but takes about 60 seconds once you know what you’re doing.
Let’s walk through everything you need to know — what spatchcocking actually is, how to do it, why it works so well, and how to turn a spatchcocked bird into one of the best things you’ve ever pulled out of your oven.
What Does “Spatchcock” Actually Mean?
The word sounds oddly formal for something so straightforward. “Spatchcock” (sometimes called “butterflying”) simply means removing the backbone of a whole chicken and pressing it flat so it cooks in a single, even layer. That’s it. No fancy equipment, no culinary school required.
The term likely comes from an 18th-century Irish expression, “dispatch the cock,” referring to a quick way of preparing poultry for cooking. Some food historians trace it even further back, but the idea has always been the same — speed up the cooking process by flattening the bird.
You might hear people use “spatchcock” and “butterfly” interchangeably. They’re nearly the same thing, though purists will tell you butterflying usually involves a slightly different cut. For our purposes, don’t worry about the distinction. The technique and the result are identical.
Why Bother Spatchcocking? What’s the Real Advantage?
Here’s the honest question: if roasting a whole chicken works fine, why go through the trouble of cutting out the backbone? Fair point. But once you understand the physics of what happens inside your oven, you’ll see why spatchcocking produces a genuinely better roast chicken almost every time.
A whole chicken is an uneven shape. The breast is thick and exposed to direct heat, while the thighs and legs are tucked underneath and shielded. Breast meat cooks faster and dries out before the dark meat at the joints reaches a safe temperature. That’s why so many roast chickens end up with overcooked white meat — the geometry is working against you.
When you flatten the bird, every piece of skin faces upward toward the heat source. The breast, thighs, and drumsticks all sit at roughly the same thickness. Heat penetrates evenly from above and below. The result? The dark meat and white meat finish cooking at nearly the same time. Skin across the entire bird gets direct exposure to hot, dry air, so it renders and crisps uniformly.
There’s also the time factor. A flattened chicken has more surface area in contact with the roasting pan, which means heat transfers faster from below. And the thinner profile means hot air doesn’t have to work as hard to cook the center. You’re looking at roughly 40 to 45 minutes at 425°F to 450°F, compared to 75 to 90 minutes for a traditional roast.
And here’s something people don’t talk about enough — spatchcocked chicken is easier to carve. The bird is already flat, the joints are exposed, and you can practically cut it into serving pieces with a few quick strokes. No wrestling with a round, wobbly carcass.
What You’ll Need Before You Start
You don’t need much. A sharp pair of kitchen shears (poultry shears if you have them) is the most important tool. A good chef’s knife works too, but shears make this dramatically easier, especially if you’re new to the technique.
Beyond that, you’ll want a sturdy cutting board with some grip — a damp towel underneath prevents sliding — and a rimmed sheet pan or roasting pan large enough to hold the flattened bird. A wire rack that fits inside the pan is a nice bonus. It lifts the chicken off the surface so air circulates underneath, which helps the skin on the bottom stay dry instead of steaming in its own juices.
If your knife skills could use some sharpening (pun intended), don’t stress. Spatchcocking is more about positioning the shears correctly than any kind of precision cutting. The bones guide you.
How to Spatchcock a Chicken: Step by Step
Let’s get into the actual process. Read through the steps once before you pick up the shears, and you’ll feel a lot more confident.
Start with the chicken breast-side down. The backbone should be facing up toward you. You’ll see the spine running down the center — that’s what you’re removing. Pat the bird dry with paper towels. A dry surface is easier to grip and leads to better skin later.
Cut along one side of the backbone. Position your shears about half an inch to one side of the spine, starting at the tail end. Cut upward toward the neck opening with firm, steady pressure. You’ll be cutting through small rib bones — they’ll give way with a satisfying crunch. If you hit resistance, adjust your angle slightly. Don’t try to rush through it.
Cut along the other side of the backbone. Repeat the same cut on the opposite side. You’ll feel the backbone loosen and then come free entirely. Set it aside — don’t throw it away. That backbone, along with the neck and giblets, is perfect for making stock. If you want to understand how stocks and broths form the backbone (no pun intended) of professional cooking, there’s a great breakdown on making consommé that gets into the principles.
Flip the chicken breast-side up. Open the bird like a book and lay it flat, skin side up. Place the heels of your hands on the breastbone and press down firmly until you hear a crack. That’s the wishbone and keel bone breaking, and it’s what allows the chicken to lie completely flat. Don’t be gentle here — you need a good, decisive press. Some people find it helps to push with a rocking motion.
Tuck the wing tips. Fold each wing tip behind the drumette, like the chicken is resting its arms behind its head. This keeps the wing tips from burning and gives the bird a tidier shape on the pan.
That’s it. The whole process takes about a minute once you’ve done it a couple of times. Your chicken is now ready to season and roast.
Seasoning a Spatchcocked Chicken
One of the best things about a flat chicken is how much surface area you have to work with. Every inch of skin is accessible. You can get seasoning under the skin, over the skin, and on the bone side — something that’s awkward with a whole, round bird.
The simplest approach works beautifully. Generous amounts of kosher salt, freshly ground black pepper, and a light coating of olive oil or melted butter. That’s a restaurant-quality roast chicken right there. Salt the bird at least 30 minutes before roasting if you can — ideally a few hours ahead, uncovered in the fridge. This dry-brining method draws moisture to the surface, the salt dissolves into it, and the liquid gets reabsorbed into the meat. The skin dries out in the fridge’s circulating air, which sets you up for seriously crispy results.
Want to go further? Compound butter works beautifully under the skin. Mix softened butter with minced garlic, fresh herbs (thyme, rosemary, and sage are classic), a pinch of lemon zest, and some salt. Carefully loosen the skin over the breast and thighs with your fingers and spread the butter directly on the meat underneath. The fat bastes the breast from the inside as it melts during roasting.
Spice rubs are another great option. Smoked paprika, cumin, coriander, garlic powder, and a little brown sugar make an excellent rub with a slightly sweet, smoky crust. Middle Eastern spice blends with sumac and za’atar create something completely different and genuinely addictive. The flat surface takes on rubs and marinades more evenly than a traditional whole bird — another spatchcocking advantage.
Pro Tip: Whatever seasoning you use, make sure you season the bone side too. People forget this constantly, and you lose half your flavor opportunity.
If you’re curious about how professional cooks think about balancing flavors across a dish — the interplay of salt, fat, acid, and heat — the principles behind seasoning are worth exploring in this piece on acid and fat.
Roasting Your Spatchcocked Chicken
High heat is your friend here. Preheat your oven to 425°F to 450°F. The flattened bird can handle aggressive heat because it cooks quickly enough that the exterior browns and crisps before the interior dries out. That’s the whole point.
Place the chicken skin-side up on a wire rack set inside a rimmed sheet pan. If you don’t have a rack, the sheet pan alone works — just know the skin on the bottom where it contacts the pan will be softer rather than crispy. Some cooks actually prefer placing the chicken directly on a bed of vegetables — thick-sliced onions, carrots, potatoes, chunks of fennel. The vegetables elevate the bird slightly, catch the dripping fat, and roast into something incredible alongside the chicken. It’s a one-pan dinner that requires almost no effort.
A 3.5 to 4-pound chicken typically takes 40 to 45 minutes at 425°F. A larger bird, say 5 to 6 pounds, might need 50 to 55 minutes. The only reliable way to know it’s done is with an instant-read thermometer. Insert it into the thickest part of the thigh, avoiding bone. You’re looking for 165°F. Some experienced cooks pull the bird at 160°F and let carryover heat bring it up during resting — the temperature will rise another 5 degrees or so off the heat.
Don’t skip the rest. Let the chicken sit for 10 minutes after it comes out of the oven. Resting allows the muscle fibers to relax and reabsorb juices that got pushed toward the surface during cooking. Cut into it too soon, and those juices run out onto your cutting board instead of staying in the meat where you want them. Tent it loosely with foil if you’re worried about it cooling too fast, though honestly, a 10-minute rest won’t make a noticeable difference in serving temperature.
Beyond the Oven: Grilling a Spatchcocked Chicken
Spatchcocking really shines on the grill — arguably even more than in the oven. A whole chicken on a grill is a headache. The height of the bird means the top stays relatively cool while the bottom burns. Flare-ups from dripping fat char the skin unevenly. Turning it is a clumsy, dangerous operation involving tongs, prayers, and usually some lost skin.
A spatchcocked chicken lays flat on the grate. You can manage the heat zones properly. And here’s the key move: set up your grill for indirect heat. On a charcoal grill, push the coals to one side. On a gas grill, light one side and leave the other off.
Place the chicken skin-side up on the cooler side of the grill. Close the lid. Let it cook through gently with indirect heat for about 30 to 35 minutes. Then, for the last 5 to 10 minutes, move it skin-side down directly over the hot coals to crisp up the skin. This two-stage approach gives you juicy meat and crackling skin without the charring and flare-ups.
Keep the grill temperature around 375°F to 400°F with the lid closed. And use your thermometer — grills have hot spots, and timing alone isn’t reliable. If you’ve ever enjoyed a proper meat-focused cookout, you know that technique matters more than equipment. There’s a great account of a meat fest weekend in Chicago that gets into how seriously good cooks approach fire and protein.
Common Mistakes and How to Avoid Them
Even though spatchcocking is straightforward, a few things trip people up. Let’s talk about the ones that come up most often.
Using dull shears. Trying to cut through poultry bones with dull kitchen shears is frustrating and potentially dangerous. Your hands slip, you squeeze harder, you lose control. Sharpen your shears before you start, or use dedicated poultry shears with a spring mechanism. It makes the backbone removal almost effortless.
Not pressing the breastbone flat enough. If the chicken still has a noticeable arch in the center, it won’t cook evenly — you’ll end up with the same unevenness you were trying to avoid. Really commit to that press. You need to crack the bone. It’s okay to use both hands, lean into it, and put some weight behind it.
Skipping dry-brining. Seasoning the bird and immediately putting it in the oven works, but you’ll miss out on crispier skin and more deeply seasoned meat. Even 30 minutes of salt on the skin makes a noticeable difference. Overnight uncovered in the fridge? That’s the gold standard.
Overcrowding the pan. If you’re roasting vegetables underneath the chicken, don’t pile them too high or pack them too tightly. They’ll steam instead of roasting. A single layer with some space between pieces gives you caramelized edges instead of soggy, pale vegetables.
Ignoring the backbone. That little strip of bone you removed has collagen-rich connective tissue and enough meat scraps to add real body to a stock. Freeze it in a bag with other trimmings — onion ends, celery leaves, herb stems — and you’ll have stock ingredients ready to go whenever you want them. A well-organized kitchen makes these kinds of habits easy to maintain, and this guide on organizing a small home kitchen is full of practical ideas from a professional chef.
Does Spatchcocking Work for Other Birds?
Absolutely. The technique works on virtually any poultry. Turkey is probably the most popular alternative, especially around Thanksgiving. A spatchcocked turkey can cut your roasting time by a third — a real advantage when you’re juggling side dishes, guests, and oven space. A 14-pound turkey that would normally take 3+ hours can be done in about 80 to 90 minutes.
Cornish game hens spatchcock beautifully and cook even faster — about 25 to 30 minutes. They make an impressive individual serving for a dinner party. Duck can also be spatchcocked, though the higher fat content means you’ll want a rack and a deeper pan to catch rendered fat (save that fat — it’s liquid gold for roasting potatoes).
The only real consideration is size. A very large turkey (20+ pounds) is harder to manage physically and may not fit on a standard sheet pan when flattened. For birds that size, you might need a large commercial-style pan or two smaller pans side by side.
A Few Flavor Combinations Worth Trying
Once you’ve nailed the basic technique, you can take spatchcocked chicken in almost any flavor direction. Here are three that I keep coming back to.
Lemon-herb with pan vegetables. Rub the bird with olive oil, lemon zest, crushed garlic, fresh thyme, and flaky salt. Lay it over a bed of small potatoes, shallots, and lemon halves. Roast at 425°F. The lemon halves caramelize and become soft enough to squeeze over the carved chicken. This is the kind of dinner that makes people think you spent hours cooking when you really spent about 15 minutes on prep.
Smoky chipotle with lime. Blend a couple of chipotles in adobo with lime juice, honey, garlic, and cumin into a paste. Rub it everywhere — over and under the skin. The sugars in the honey caramelize into a dark, lacquered crust. Serve with warm tortillas, pickled red onions, and cilantro. Making your own pickled onions is easier than you’d think and adds a bright, acidic contrast that cuts through the richness perfectly.
Herbes de Provence with butter. Mix softened butter with herbes de Provence (or just dried lavender, thyme, rosemary, and savory), a minch of garlic, and salt. Spread generously under the skin of the breast and thighs. Roast over halved fennel bulbs and cherry tomatoes. There’s something about this combination that feels both rustic and elegant — the kind of cooking you’d find in the French countryside. If French flavors are your thing, you might enjoy trying this French seasoning salt as a finishing touch.
How to Carve a Spatchcocked Chicken
Carving is dramatically simpler than with a traditional roast. The bird is already flat, so you can see every joint clearly.
Start by cutting the thighs away from the breast. A sharp knife slid along the natural seam between the breast and thigh pops the leg quarter free with minimal effort. Separate the drumstick from the thigh by cutting through the joint — wiggle the leg to find where it pivots, and that’s where your knife goes.
For the breast, you can either slice it right off the bone in one piece and then cut crosswise into slices, or cut the whole breast section in half straight down the center breastbone. Wings come off with a simple cut through the shoulder joint.
The whole process takes about two minutes. No carving fork, no awkward balancing act, no audience watching nervously while you hack at a round bird. That ease of serving is something professional chefs rely on when they need to get food to the table quickly and beautifully.
Frequently Asked Questions
How long does it take to spatchcock a chicken?
The actual cutting and flattening takes about 60 seconds once you’re comfortable with the technique. The first time might take two to three minutes as you figure out the angle for your shears. After that, it becomes second nature. The whole process — patting dry, removing the backbone, pressing flat, and tucking the wings — is done before your oven finishes preheating.
Can I spatchcock a chicken ahead of time?
Yes, and you probably should. Spatchcock the bird, season it generously with salt, and place it uncovered on a wire rack set over a sheet pan in the fridge. Letting it sit for 4 to 24 hours allows the salt to penetrate the meat and the skin to dry out, both of which improve the finished product significantly. When you’re ready to cook, pull it out, add any additional seasoning, and roast.
Is spatchcocking better than roasting a whole chicken?
For crispier skin, more even cooking, and faster roasting, yes — spatchcocking has clear advantages. The one thing you give up is the presentation of a picture-perfect whole roasted bird on the table. If the Norman Rockwell look matters to you, roast it whole. If you care more about the eating experience, spatchcock every time.
What temperature should I use for spatchcocked chicken?
Most cooks find 425°F to 450°F ideal. The high heat crisps the skin quickly and cooks the flattened bird in 40 to 45 minutes. Some recipes call for starting at a very high temperature (475°F) for the first 15 minutes to blast the skin, then reducing to 400°F for the remainder. Both approaches work well.
Do I need a special pan to roast a spatchcocked chicken?
A standard rimmed sheet pan (also called a half sheet pan) is perfect. The flat surface accommodates the spread-out bird easily. If you have a wire rack that fits inside, use it — the airflow underneath helps the skin crisp on all sides. No special equipment needed.
Your Next Roast Chicken Should Be a Flat One
Once you spatchcock your first chicken and see how much crispier the skin gets, how evenly the meat cooks, and how much less time you spend waiting by the oven, it’s hard to go back to the traditional method. The technique takes seconds to learn, requires tools you already own, and produces noticeably better results.
Grab a whole chicken this weekend, take your shears to the backbone, and give it a try. Save that backbone for stock. Season generously, roast at high heat, and let it rest before you carve. You’ll wonder why you didn’t start doing this years ago.