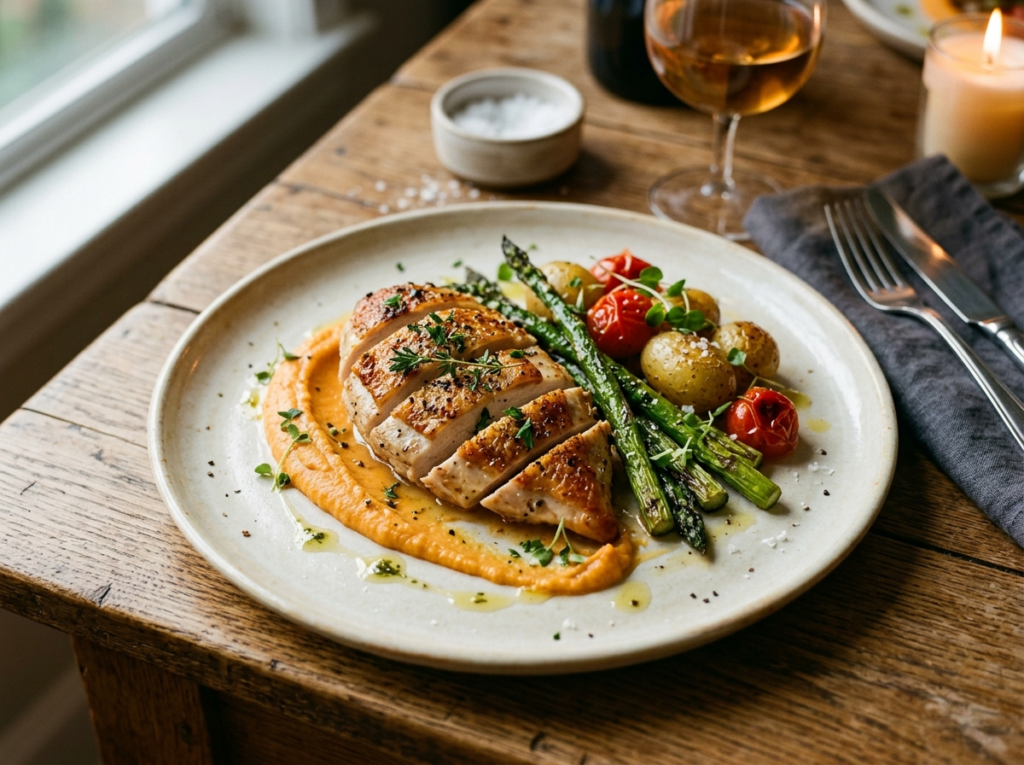
You spent forty-five minutes making that chicken. The sauce is perfect. The vegetables are roasted just right. And then you dump everything on a plate like you’re loading a wheelbarrow — and suddenly, a gorgeous meal looks like cafeteria lunch.
Sound familiar? Here’s the thing: we really do eat with our eyes first. A study published in the journal Flavour found that people rated the exact same salad as tastier and more desirable when it was plated artfully versus tossed together casually. Same ingredients. Same flavors. The only difference was how it looked on the plate.
But food plating isn’t just for restaurant chefs with tweezers and squeeze bottles. You don’t need fancy equipment, edible flowers, or a culinary degree. You just need a few simple principles that work every single time — and you can start using them tonight with whatever’s already in your kitchen.
That’s exactly what we’ll cover here. Real, practical plating tips for home cooks who want their food to look as good as it tastes.
Why Presentation Actually Matters (More Than You Think)
Let’s get one thing out of the way — caring about how your food looks doesn’t make you pretentious. It makes you human.
Our brains process visual information faster than any other sense. Before you smell or taste your dinner, your eyes have already formed an opinion. That first visual impression triggers expectations about flavor, freshness, and quality. When food looks appealing, your brain literally primes your taste buds to enjoy it more.
Think about your favorite restaurant meal. Part of the reason it felt special was the presentation, right? The sauce wasn’t pooled in a messy puddle. The protein sat at a slight angle. There was something green to break up the browns and yellows. It told a tiny visual story.
You can tell that same story at home. And once you start doing it, you’ll notice something interesting: even a simple Tuesday night dinner feels a little more intentional, a little more enjoyable. Your family notices. Your dinner guests notice. You notice. It transforms cooking from just “feeding people” into something that genuinely feels creative.
This isn’t about perfection or Instagram likes. It’s about honoring the effort you already put into your cooking. You made something delicious — so why not let it look that way?
Start With the Right Plate
Before you even touch your food, the plate itself sets the stage. And most home cooks grab whatever’s closest in the cabinet without a second thought.
White plates are your best friend. There’s a reason almost every professional kitchen uses them. White acts like a blank canvas — it makes colors pop, lets textures stand out, and doesn’t compete with the food for attention. If you’re cooking a vibrant stir-fry with red peppers, green snap peas, and golden tofu, a white plate turns those colors into a painting. A busy patterned plate turns them into visual noise.
You don’t need to buy expensive dinnerware either. A simple set of plain white plates — round, maybe 10 to 12 inches — gives you enormous flexibility. If you want to get a little more creative, matte plates in dark colors like charcoal or navy work beautifully for lighter-colored foods. Imagine a piece of pan-seared halibut on a dark slate plate. The contrast alone makes it look restaurant-worthy.
Size matters too. One of the most common plating mistakes is using a plate that’s too small. When food is crammed edge to edge, everything looks cluttered and heavy. Chefs often plate on dishes that leave 30 to 40 percent of the surface empty. That empty space — the “negative space” — is doing a lot of visual work. It frames your food. It gives the eye room to breathe. It makes a modest portion look intentional rather than skimpy.
Quick tip: If you’re serving a composed dish (meaning everything is arranged rather than spooned on), go one plate size up from what you’d normally use. The extra room changes everything.
The Power of Odd Numbers and Asymmetry
Here’s a plating secret that sounds weird until you try it: odd numbers are more visually appealing than even ones.
Three scallops look better than four. Five roasted Brussels sprouts arranged thoughtfully are more interesting than six. It’s not a food thing — it’s a design principle. Our brains find odd-numbered groupings more dynamic and natural. Even numbers feel static, symmetrical, and a little predictable.
This connects to a bigger idea: asymmetry creates visual interest. Your instinct might be to center everything perfectly on the plate — protein in the dead middle, vegetables flanking both sides like little soldiers. That’s fine, but it’s also a bit boring.
Instead, try placing your main element slightly off-center. Let it sit in the lower third of the plate, or shift it toward one side. Now you’ve created a sense of movement. The eye travels across the plate instead of landing in the middle and stopping.
A good mental model is the clock face. Imagine your plate as a clock. Place your protein around 6 o’clock, your starch near 10, and your vegetables around 2. This triangular arrangement naturally feels balanced without looking rigid. Professional chefs use variations of this layout constantly, and it works just as well with a weeknight pork chop as it does with a Michelin-starred tasting course.
Building Height and Dimension
Flat food looks boring. Sorry, but that’s the truth. When everything on your plate sits at the same level, it reads as one-dimensional — like a photograph with no depth.
The fix is simple: build upward.
You don’t need to construct towers of food (that trend peaked in the 1990s anyway). But even a little height creates drama and makes a plate feel more dynamic. Stack your mashed potatoes instead of spreading them flat. Lean your grilled asparagus against the protein instead of laying the spears down. Place your chicken breast partly on top of your grain pilaf rather than next to it.
One technique that works every time: the bed and lean. Create a small bed of your starch or vegetable, then lean your protein against it at a slight angle. This instantly adds dimension. A piece of salmon looks ten times better resting at a tilt against a mound of rice than it does lying flat beside it.
Another trick chefs rely on is layering. Instead of keeping every component separate, let things overlap slightly. A slice of steak can rest partially on a smear of sauce. Roasted vegetables can nestle into a grain salad. This creates depth and makes the dish look cohesive, like it belongs together — because it does.
If you’re someone who enjoys the art of organizing your home kitchen for efficiency, think of plating as an extension of that same mindset. It’s all about intention.
Sauces: The Secret Weapon You’re Probably Misusing
Most home cooks pour sauce directly over their food. It’s the default move. And it’s almost always the wrong one.
Here’s why: when you blanket everything in sauce, you hide the textures and colors you worked hard to create. That beautifully seared crust on your steak? Gone. The golden char on your roasted carrots? Buried. Sauce should enhance, not conceal.
The smear is the easiest sauce plating technique to master. Spoon a dollop of sauce onto the plate, then use the back of the spoon to drag it in one confident motion. You’ll get a beautiful swoosh that adds movement and color without covering anything up. This works with purees, compound butters, yogurt sauces, chimichurri — basically anything with some body to it.
The pool is another option. Spoon your sauce onto the plate first, then place your food on top. This keeps the sauce visible while letting your protein or vegetables sit elevated. It’s an especially good approach for pan sauces and reductions.
Dotting works well for thinner sauces or oils. Use a squeeze bottle (or a spoon if you’re careful) to place small dots of sauce around the plate. It sounds fussy, but even three or four dots of a bright green herb oil can transform a simple grilled chicken plate.
And if you’ve been working on your consommé game, pour it tableside into a shallow bowl that already has your garnishes arranged. That moment of warm, clear broth flooding over carefully placed vegetables? It’s effortlessly impressive.
Pro Tip: Keep a plastic squeeze bottle in your kitchen. They cost about a dollar, and they give you precise control over sauce placement. Chefs use them for everything.
Color, Contrast, and the Garnish Question
If your plate looks monochromatic, something’s off. Not “wrong” exactly — but there’s an opportunity you’re missing.
Color contrast is one of the fastest ways to make food look better. The human eye is drawn to contrast, and food is no different. Brown protein on a brown plate with brown gravy? That’s visually flat, no matter how delicious it tastes. But add a pop of bright green — a handful of fresh herbs, a scattering of microgreens, a few peas — and suddenly the whole plate wakes up.
Here’s a practical way to think about it: look at your plate and count the colors. If you see fewer than three distinct ones, add something. A squeeze of lemon (yellow). A few pomegranate seeds (ruby red). A drizzle of olive oil (green-gold). Thinly sliced radishes (pink and white). These additions take seconds and make an outsized visual impact.
Now, let’s talk about garnish — because this is where home cooks either overthink or give up entirely.
A garnish should relate to the dish. This is the golden rule. If there’s no parsley in your recipe, a random sprig of parsley on top looks exactly like what it is — decoration with no purpose. Instead, think about what’s already in the food. Used thyme in your sauce? A few small thyme leaves on top tie things together. Made a citrus vinaigrette? A thin curl of lemon zest makes sense. The garnish should whisper, “I belong here.”
Things that work as garnishes almost universally: fresh herbs (torn, not chopped into dust), a crack of black pepper, flaky finishing salt like Maldon, a drizzle of high-quality olive oil, toasted seeds or nuts, and thinly shaved hard cheese.
Things that don’t work: that lonely parsley sprig nobody eats, massive rosemary branches that look like twigs, and anything that’s purely decorative with no connection to flavor.
Texture: The Overlooked Element
Color gets all the attention, but texture is quietly doing just as much work on your plate.
A dish that’s all soft and smooth — think mashed potatoes, braised meat, and steamed vegetables — might taste incredible, but it photographs and reads as mushy. Your eye wants variety. It wants something crunchy next to something creamy. Something crispy next to something tender.
This is why a simple sprinkle of toasted breadcrumbs can save a plate of pasta. Why fried shallots on top of a soup make it look 10x more appealing. Why a handful of pomegranate seeds on a grain bowl adds so much visual pop — they look like little jewels, and the textural promise (crunchy, juicy) makes your mouth water before you take a bite.
When you’re plating, ask yourself: where’s my crunch? If you don’t have one, add it. Toast some pine nuts. Crisp up some prosciutto. Fry a few sage leaves. Even crumbling a cracker or crouton over the top works.
The same principle applies to your knife skills. How you cut your ingredients affects texture and visual appeal. Uniformly diced vegetables look cleaner and more professional than haphazard chunks. A chiffonade of basil (thin ribbons) reads completely different from roughly chopped leaves. You don’t need to be a surgeon about it — just be intentional.
The “Less Is More” Rule (and When to Break It)
There’s a classic culinary saying: the plate is finished not when there’s nothing left to add, but when there’s nothing left to take away.
Most home cooks overload their plates. It’s understandable — you made a lot of food and you want to show it off. But crowded plates look messy, and they actually make food less appetizing. Your eye doesn’t know where to focus. There’s no hierarchy, no star of the show.
Try this experiment next time you serve dinner: plate about 20 percent less food than you normally would. Use that extra space to arrange things thoughtfully. Suddenly, your Tuesday night chicken thigh looks like it came from a bistro.
This doesn’t mean tiny portions — it means giving food room. If people want seconds, they can get seconds. But that first plate, the one they see, should look composed.
When to break this rule? Family-style meals. Abundance is the whole point of a big communal spread. When you’re loading up a platter for the Thanksgiving table or a summer cookout spread, pile it high. Let things tumble and overlap. That overflowing, generous look is the presentation. Context matters.
Wipe the Edges (Seriously, Just Do It)
This might be the simplest plating tip in existence, and it makes the biggest immediate difference.
Before you bring a plate to the table, grab a clean, damp kitchen towel and wipe the rim. Every drip, smear, and sauce splatter disappears. The plate instantly looks cleaner and more intentional.
Professional chefs do this with every single plate that leaves the kitchen. Every. Single. One. It takes three seconds. And it’s the difference between “I plated this carefully” and “I slopped this together.”
Pay special attention if you’ve been working with sauces, oils, or anything with turmeric (that stuff stains everything it touches). A clean rim frames your food the way a frame borders a painting. You wouldn’t hang a beautiful piece of art in a dirty frame, right?
Plating for Specific Situations
Different meals call for different approaches. Here’s how to adjust your plating depending on the scenario.
Weeknight Dinners
Keep it simple. You’re not trying to impress a food critic — you’re feeding your family. But even small touches make a difference. Stack your rice instead of spreading it. Add one garnish element. Wipe the plate edge. Three small changes, thirty extra seconds, noticeably better-looking food.
Date Night at Home
This is where you can have fun. Use your nicest plates. Play with height. Add a sauce swoosh. Light a candle next to the plate (lighting genuinely changes how food looks — warm candlelight makes everything more golden and appetizing). Pair it with the right wineglass and you’ve created an experience, not just a meal.
Dinner Parties
Think about the journey. If you’re doing multiple courses, vary your plating style from course to course. Start with something minimal and elegant (a clean soup bowl with a few precise garnishes), then build toward more abundant, dramatic plating as the meal progresses. This creates rhythm and keeps your guests visually engaged.
Brunches and Breakfasts
Don’t underestimate breakfast plating. A plate of scrambled eggs looks twice as good with a few cherry tomato halves, some fresh herbs, and a piece of toast cut on the diagonal. Diagonal cuts — on toast, sandwiches, anything really — are inexplicably more appealing than straight ones. Try it and tell me I’m wrong.
Learning From the Pros (Without Going Overboard)
You don’t need to replicate what you see on cooking competition shows. Those chefs have tweezers, ring molds, squeeze bottles, offset spatulas, and a team of people. You have a spatula and maybe a willing kid holding a plate.
But you can borrow their principles. The core ideas behind professional plating are simple: contrast, balance, height, negative space, and intentional color. You don’t need special tools to apply any of them.
If you want to practice, Instagram and Pinterest are surprisingly useful. Not for copying elaborate plates, but for training your eye. Scroll through food photography accounts and start noticing patterns. Where do chefs place the protein? How much empty space do they leave? What colors keep showing up together? Your eye will get sharper over time, and you’ll naturally start making better plating choices without consciously thinking about it.
You can also pick up plating ideas from the tricks professional chefs use in their own kitchens. Many of their techniques translate directly to home cooking — you just need to scale them down.
And if you want to take your foundational cooking skills up a notch alongside your plating, understanding concepts like acid and fat balance can help too. Better-tasting food and better-looking food tend to go hand in hand.
Common Plating Mistakes (and Easy Fixes)
Let’s run through the most frequent things that trip home cooks up.
Overcrowding the plate. We talked about this, but it bears repeating. Pull back. Leave space. Your food will look more intentional.
Everything at the same height. Build up. Lean things against each other. Create peaks and valleys. Even a half-inch of height difference makes your plate more interesting.
Forgetting about the sauce. Sauce under or beside the food, not drowning it. Always.
Using the wrong plate. Too small, too busy, wrong color. When in doubt, go white and go bigger than you think you need.
Chopping herbs into confetti. Tiny herb bits sprinkled over a dish look like green dust. Tear or chiffonade your herbs instead. Whole small leaves (like micro basil or baby arugula) work beautifully too.
Ignoring temperature. This isn’t strictly a visual tip, but warm food on a cold plate cools down fast and loses its steam (literally). Warm your plates in a low oven for a few minutes before plating. When food arrives at the table still gently steaming, it looks — and stays — more appealing.
FAQ
Do I need to buy special tools for plating at home?
Not at all. A good spoon, a clean kitchen towel, and a pair of tongs handle 90 percent of home plating. If you want to level up slightly, grab a squeeze bottle (great for sauces) and an offset spatula (helpful for smearing and spreading). Both cost just a few dollars. Ring molds are fun but completely optional — you can get the same stacking effect using a clean tuna can with both ends removed.
How do I make simple foods like pasta or stew look better on a plate?
For pasta, use tongs to twirl a neat nest rather than dumping it from the pot. Place it slightly off-center in a wide, shallow bowl. Add your sauce to the center, not all over. Finish with a drizzle of olive oil, fresh herbs, and some grated cheese. For stews and braises, use a deep bowl, add your garnish after ladling (a swirl of cream, a few herb leaves, a crack of pepper), and serve with bread on the side — not in the stew. These small adjustments make humble dishes look thoughtful.
Is food plating only for fancy meals?
Absolutely not. Plating is for any meal you’re proud of. A well-plated grilled cheese with a side of tomato soup looks and feels special. It takes the same amount of time to arrange food with a little thought as it does to pile it on haphazardly. Once you build the habit, you’ll do it automatically — even for solo weeknight dinners.
How do restaurants make portions look bigger than they are?
They use three main tricks: taller plating (stacking upward instead of spreading outward), strategic use of sauces and garnishes to fill visual space, and larger plates with intentional negative space that frames the food. The portion feels generous because it’s presented with confidence, not because there’s necessarily more food.
Your Plate, Your Canvas
The beauty of learning to plate food well is that it costs nothing, takes very little extra time, and makes every meal feel a little more special. You don’t need culinary school. You don’t need expensive plates. You don’t need tweezers or edible flowers or powdered gold dust.
You need a clean plate, a few simple principles, and the willingness to spend an extra 30 seconds thinking about how your food lands on that dish. Start tonight. Pick just one tip from everything you’ve read here — maybe it’s the sauce swoosh, or building a little height, or simply wiping the plate rim — and try it. See how it changes the way your dinner looks. See how it changes the way your dinner feels.
Because at the end of the meal, food that looks good doesn’t just taste better. It tells the people you’re feeding — including yourself — that this meal mattered. And that’s worth thirty extra seconds every time.